Posts

Showing posts with the label using kotlin

Popup Menu Programatically | Android Studio | Kotlin

Image
How to create a Popup Menu programmatically? The Popup Menu in Android displays the menu below the anchor text if space is available otherwise displays above the anchor text. The Popup Menu disappears if you click outside the Popup Menu . The Popup Menu displays different options/choices list so you can select any of them to perform different tasks. >>Check For Java Video: Step 1:  Create a new project  OR  Open your existing project Step 2: Code activity_main.xml <?xml version="1.0" encoding="utf-8"?> <LinearLayout xmlns:android= "http://schemas.android.com/apk/res/android" xmlns:app= "http://schemas.android.com/apk/res-auto" xmlns:tools= "http://schemas.android.com/tools" android:layout_width= "match_parent" android:layout_height= "match_parent" android:orientation= "vertical" android:gravity= "center" tools:context= ".MainActivity...

Popup Menu using menu.xml | Android Studio | Kotlin

Image
How to create a Popup Menu using the menu.xml? The Popup Menu in Android displays the menu below the anchor text if space is available otherwise displays above the anchor text. The Popup Menu disappears if you click outside the Popup Menu . The Popup Menu displays different options/choices list so you can select any of them to perform different tasks. >>Check For Java Video: Step 1:  Create a new project  OR  Open your existing project Step 2: Code menu.xml <?xml version="1.0" encoding="utf-8"?> <menu xmlns:android= "http://schemas.android.com/apk/res/android" > <!--items to show in popup menu--> <item android:id= "@+id/menu_copy" android:title= "Copy" /> <item android:id= "@+id/menu_share" android:title= "Share" /> <item android:id= "@+id/menu_save" android:title= "Save" /> <item a...

Photo Editor | Android Studio | Kotlin

Image
Image Editor | Android Studio | Kotlin Android allows us to apply many kinds of effects on images. In this tutorial, we will apply some effects to an Image in the ImageView. We will apply the following effects to the image. Gray Bright Dark Red/Gama Green Blue >>Watch For Java Step 1:  Create a new project  OR  Open your existing project Step 2: Place image in the drawable folder Place any image (to apply the effects to it) in the drawable folder. Step 3: Code activity_main.xml <?xml version="1.0" encoding="utf-8"?> <RelativeLayout xmlns:android= "http://schemas.android.com/apk/res/android" xmlns:tools= "http://schemas.android.com/tools" android:layout_width= "match_parent" android:layout_height= "match_parent" android:padding= "10dp" tools:context= ".MainActivity" > <TextView android:id= "@+id/label1Tv" android:layout_w...

Spinner - Android Studio - Kotlin

Image
How to use the Spinner in Android Studio with Kotlin In this tutorial, you’ll learn how to use a  Spinner in Android Studio using Kotlin . A Spinner in Android works like a drop-down menu that displays a list of values, allowing the user to select  one option at a time . The Android Spinner is part of the  AdapterView  family, which means it requires an  Adapter  to bind data to the UI. In this example, we’ll use an adapter to populate the Spinner with items and handle user selection events. >>  Check For Java >>  Check For Kotlin >>  Check For Compose Code: activity_main.xml <?xml version="1.0" encoding="utf-8"?> <LinearLayout xmlns:android= "http://schemas.android.com/apk/res/android" xmlns:app= "http://schemas.android.com/apk/res-auto" xmlns:tools= "http://schemas.android.com/tools" android:layout_width= "match_parent" android:layout_height= "match_parent" andr...

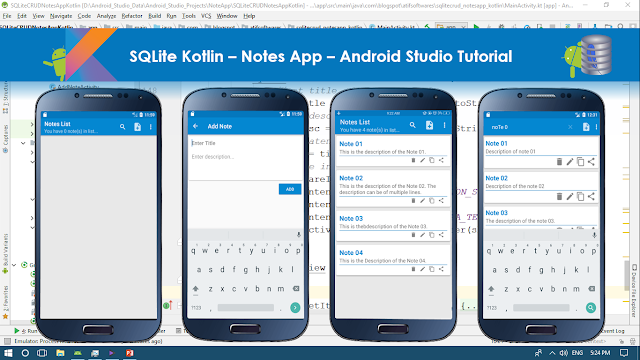
SQLite Kotlin – Notes App – Android Studio Tutorial

Image
In this tutorial we will make a "Notes App" using SQLite and Kotlin. It will contain following features. ✓Enter Data ✓Retrieve Data in ListView ✓Update/Edit Data ✓Delete Data ✓Search Data ✓Copy Data ✓Share Data Step 01:  Create a new Project  or  open new project Step 02: Create layout resource file under res>layout folder Step 03: Create new "Android Resource Directory" by clicking "res>New>Android Resource Directory", choose menu from Resource type Step 04: Create menu_main.xml by clicking "menu>New>Menu resource file"  Step 05: Create empty Activity name it as "AddNoteActivity.kt" Step 06: Create Class Note.kt Step 07: Create Class DbManager.kt Step 08: Source Code build.gradle(module:App) apply plugin: 'com.android.application' apply plugin: 'kotlin-android' apply plugin: 'kotlin-android-extensions' android { compileSdkVersion 27 defaultConfig { ...