Add items/menu in Actionbar/Toolbar (Kotlin) - Android Studio
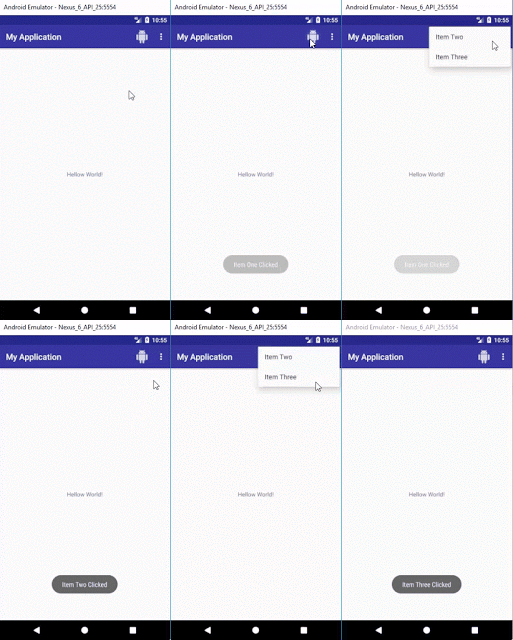
In this tutorial we will add items in actionbar/toolbar, 3-dot menu in actionbar/toolbar and handle item clicks using Kotlin. There will be three items in menu you can add as many as you want. One item will be displayed on action bar with icon, other two items will be displayed by clicking 3-dot menu...
Step 1: Create a new Project or open new project
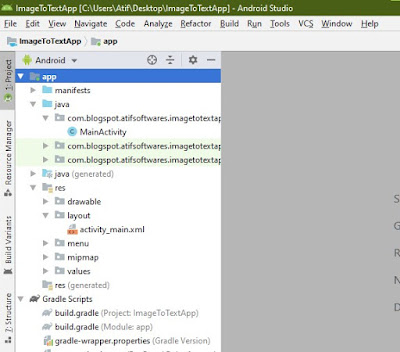
Step 2: Create new "Android Resource Directory" by clicking "res>New>Android Resource Directory", choose menu from Resource type
Step 3: Create menu.xml by clicking "menu>New>Menu resource file"
menu.xml
<?xml version="1.0" encoding="utf-8"?><menu
xmlns:android="http://schemas.android.com/apk/res/android" xmlns:app="http://schemas.android.com/apk/res-auto"> <item
android:id="@+id/action_one" android:icon="@drawable/ic_action_name" app:showAsAction="always" android:title="Item One"/> <item
android:id="@+id/action_two" android:title="Item Two"/> <item
android:id="@+id/action_three" android:title="Item Three"/> </menu>
|
activity_main.xml
<?xml version="1.0" encoding="utf-8"?>
<android.support.constraint.ConstraintLayout xmlns:android="http://schemas.android.com/apk/res/android"
    xmlns:app="http://schemas.android.com/apk/res-auto"
    xmlns:tools="http://schemas.android.com/tools"
    android:layout_width="match_parent"
    android:layout_height="match_parent"
    tools:context=".MainActivity">

    <TextView
        android:layout_width="wrap_content"
        android:layout_height="wrap_content"
        android:text="Hello World!"
        app:layout_constraintBottom_toBottomOf="parent"
        app:layout_constraintLeft_toLeftOf="parent"
        app:layout_constraintRight_toRightOf="parent"
        app:layout_constraintTop_toTopOf="parent" />

</android.support.constraint.ConstraintLayout>
MainActivity.kt
package com.blogspot.devofandroid.myapplication

import android.support.v7.app.AppCompatActivity
import android.os.Bundle
import android.view.Menu
import android.view.MenuItem
import android.widget.Toast

class MainActivity : AppCompatActivity() {

    override fun onCreate(savedInstanceState: Bundle?) {
        super.onCreate(savedInstanceState)
        setContentView(R.layout.activity_main)
    }


    override fun onCreateOptionsMenu(menu: Menu): Boolean {
        // Inflate the menu; this adds items to the action bar if it is present.
        menuInflater.inflate(R.menu.menu, menu)
        return true
    }

    override fun onOptionsItemSelected(item: MenuItem): Boolean {
        // Handle action bar item clicks here.
        val id = item.getItemId()

        if (id == R.id.action_one) {
            Toast.makeText(this, "Item One Clicked", Toast.LENGTH_LONG).show()
            return true
        }
        if (id == R.id.action_two) {
            Toast.makeText(this, "Item Two Clicked", Toast.LENGTH_LONG).show()
            return true
        }
        if (id == R.id.action_three) {
            Toast.makeText(this, "Item Three Clicked", Toast.LENGTH_LONG).show()
            return true
        }

        return super.onOptionsItemSelected(item)

    }

}
Step 6: Run Project
Output


Comments
Post a Comment