Posts

Showing posts from January, 2020

CheckBox | Android Studio | Kotlin

Image
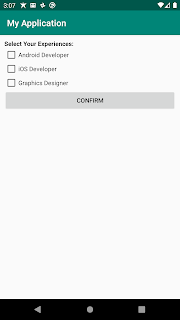
CheckBox | Android Studio | Kotlin CheckBoxes are used to select one or more options from the available options. For example , you have a list of colors and the user can choose one or more colors from that list. We can use the CheckBox widget of android in such scenarios. >>Watch For Java Step 1:  Create a new project   or   open an existing project Step 2: Code Check If CheckBox is checked or not if (androidCb.isChecked) { //check box is checked } else { //check box is not checked or unchecked } Add  CheckedChange Listener on a CheckBox androidCb.setOnCheckedChangeListener { _, isChecked -> //check if checkbox is checked or not if (isChecked) { //checkbox is checked } else { //checkbox is not checked } } Complete Example activity_main.xml <?xml version="1.0" encoding="utf-8"?> <LinearLayout xmlns:androi...

CheckBox | Android Studio | Java

Image
CheckBox | Android Studio | Java CheckBoxes are used to select one or more options from the available options. For example , you have a list of colors and the user can choose one or more colors from that list. We can use the CheckBox widget of android in such scenarios. >>Watch For Kotlin Step 1:  Create a new project   OR   Open your existing project Step 2:  Code Check If CheckBox is checked or not if ( androidCb . isChecked ()) { //check box is checked } else { //check box is not checked or unchecked } Add CheckedChange Listener on a CheckBox androidCb . setOnCheckedChangeListener ( new CompoundButton . OnCheckedChangeListener () { @Override public void onCheckedChanged ( CompoundButton buttonView , boolean isChecked ) { //check if checkbox is checked or not if ( isChecked ) { //checkbox is checked } e...

SharedPreferences | Android Studio | Java

Image
SharedPreferences | Android Studio | Java SharedPreferences is one of the types of saving data in Android Devices. You can save String , int , boolean , long , float , and Set<String>   types of data in  SharedPreferences . In SharedPreferences data is saved in the key-value form. If you have a relatively small collection of key-values that you'd like to save, then you should use the SharedPreferences APIs. You can Add, Edit/Modify and Remove data from the  SharedPreferences  easily. To get the access to the preferences, we have the three APIs to choose from: getPreferences() :  used from within your Activity, to access the activity-specific preferences. getSharedPreferences() : used from within your Activity (or other application Context), to access the application-level preferences. getDefaultSharedPreferences() : used on the PreferenceManager, to get the shared preferences that work in concert with Android’s overall preferenc...

SharedPreferences | Android Studio | Kotlin

Image
SharedPreferences | Android Studio | Kotlin SharedPreferences  is one of the types of saving data in Android Devices. You can save  String ,  int ,  boolean ,  long ,  float , and  Set<String>   types of data in  SharedPreferences . In  SharedPreferences  data is saved in the  key-value  form. If you have a relatively small collection of  key-values  that you'd like to save, then you should use the  SharedPreferences  APIs. You can Add, Edit/Modify and Remove data from the  SharedPreferences  easily. To get the access to the preferences, we have the three APIs to choose from: getPreferences() :  used from within your Activity, to access the activity-specific preferences. getSharedPreferences() :  used from within your Activity (or other application Context), to access the application-level preferences. getDefaultSharedPreferences() :  used on the Preference...

Spinner | Android Studio | Kotlin

Image
Spinner Example | Android Studio |  Kotlin In this tutorial, we will learn how to use Spinner. Android spinner is like the drop-down menu with multiple values from which the end-user can select only one value. Android spinner is associated with AdapterView. So you need to use one of the adapter classes with spinner. We will select an item from the Spinner and set it to the TextView. >>Watch For Java Step 1:  Create a new Project   or   open a new project Step 2: Code activity_main.xml <?xml version="1.0" encoding="utf-8"?> <RelativeLayout xmlns:android= "http://schemas.android.com/apk/res/android" xmlns:app= "http://schemas.android.com/apk/res-auto" xmlns:tools= "http://schemas.android.com/tools" android:layout_width= "match_parent" android:layout_height= "match_parent" android:padding= "5dp" tools:context= ".MainActivity" > ...